How to Build Your Own Server

Building a personal server has always been one of those project I know I will get on to someday but just don't have the time for it. At the start of this summer, I finially decided to get on to it. The process is a bit taunting if you never experienced working with a server. But trust me, it is not as difficult as you might have thought.
What do I need?
One always running Laptop/Desktop with stable network connection. The Operation System does not matter here because we will be using Linux.
One empty USB drive for installing Linux.
And that is all you need! Yes, you heard me right. No need to rent a expensive cloud server and paying monthly subscription. As long as you have a computer with stable network connection you can make your very own always running personal website up and running!
Setup
First and formost, remember to back up the important files on your computer. Once we install the server OS on the computer, we are also formating all files in that computer, so parepare in advance. The computer we choose to host our server doesn't have to be a super powerful one. Considering most personal website are static and doesn't crazy animation/interaction, a used machaine from couple of years ago or that old laptop you replaced with the newest Macbook will do the trick.
For me, I am using a 2014 Mac-mini that I found in the facebook market with only $40 - a worthy investment.

Next, we will need to download the Server OS. In this article, we will be using the Ubuntu release. Head to the Ubuntu Official Website. The Ubuntu 24.04.2 LTS is the latest version at the time of writing this article so let us just download that. Here LTS stand for long-term-support but honestly the latest version with nine months security support would be no different.
You will need some program to burn the iso file into the usb drive. Here I am using Rufus. There are plenty of options for this step like Unetbootin, Popsicle, Windows USB/DVD Download Tool, RMPrepUSB, Yumi, UUByte ISO Burner, or Wintoflash. Any of them would do the trick.
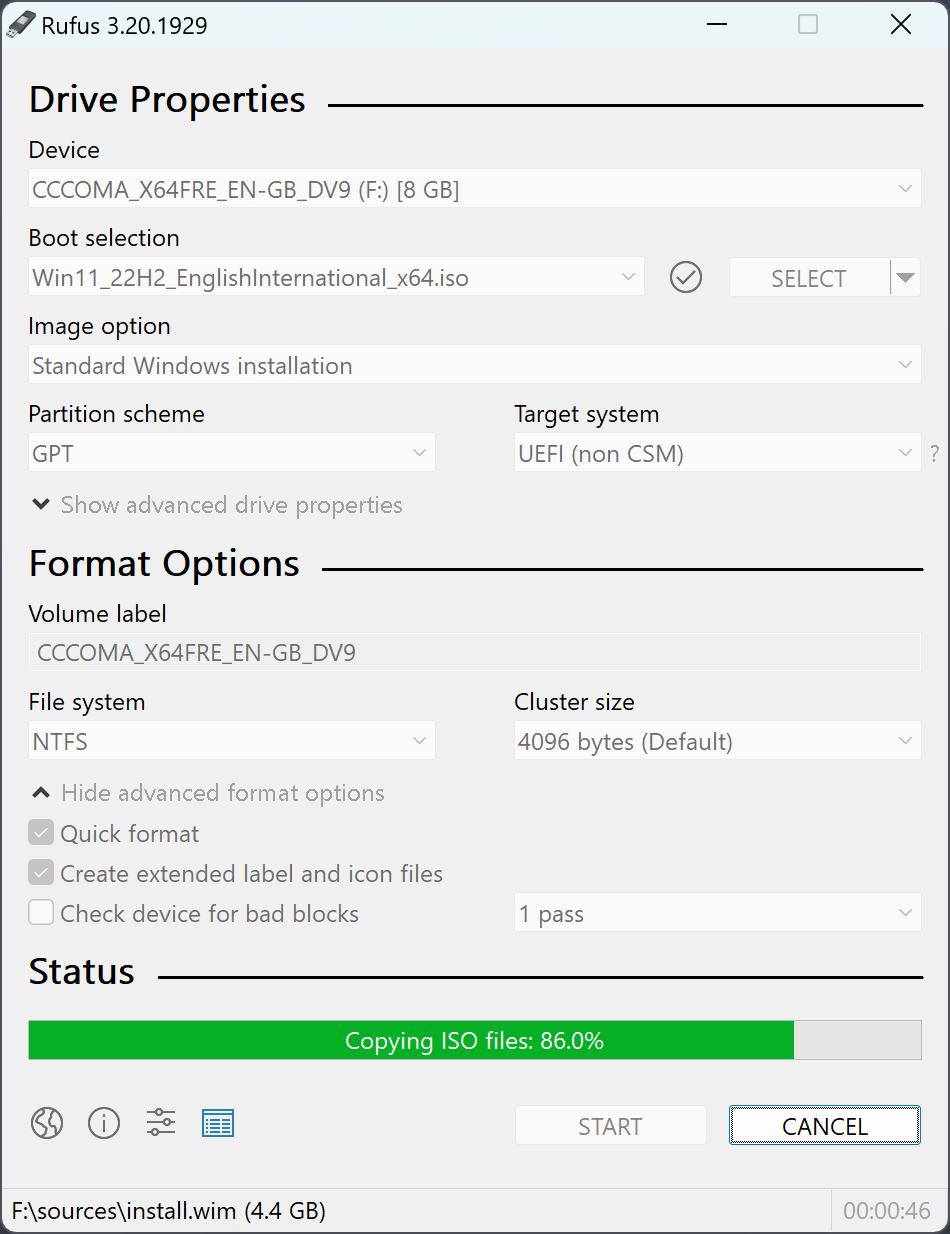
(rufus interface)
Installation
After we burn the iso file into the USB drive, we can then start our installation. Head to your computer. Plug the bootable usb drive into the computer and restart your computer.
For Mac, you will need to press and hold Command (⌘) and R keys while powering on, releasing them when you see the Apple logo or a spinning globe.
For Windows, hold down the Shift key while restarting from the Start menu or by holding it down during startup when prompted.
Once you are inside of security start page, you can then choose the boot drive to load your Operating System. And we are going to choose to the boot drive we just created. Follow the Linux installation guide and install the linux on your device. There are extensive guide on this part - like this one from official Ubuntu wesite
Follow any guide should help you get to it. For better performance, I am assuming we are installing the linux version without a GUI(graphic user interface).
Configure
Part 1: DNS set up.
Once you have successfully set up Linux for you server, we can then start configuring the network part. Here is a little back ground knowledge.
As long as anyone have your IP address, they can communicate with your machine. But who want to remember a serious of series long digit everytime they want to log into a website like 192.168.1.1? Introducing DNS service or Domain Name System. DNS is the backbone of the modern day internet in which it transfer alphabetical/number strings into a IP address. When you type in google.com in your browser, your browser inquire to the nearest DNS server through your ISP (internet service provider) to give you back the IP address of a google's server. Then according to your link for example google.com/maps or mail.google.com/mail, google's internal DNS server then will direct you to the right server providing such serive.
We too need to configure our IP address with a DNS server such that when others type jxins.duckdns.org, they will be direct to the website hosting this article.
But we do face a challenge here. Most ISPs do not provide static IP address to general public, which means your IP address will be changing from time to time. This is because maintaining a static IP address could be costly for your ISP whereas having a dynamic IP address provide flexibility, especially when your ISP need to re-routing traffic - which happened a lot common due to numerous factors like server down unexpectedly, too many traffic on one point, and etc.
So how should we reslove it?Introducing DDNS or Dynamic Domain Name System. DDNS allows you to match a dynamicly changing IP address to a fix domin. It is the solution for small scale server exactly like us. Popular DDNS provider are dnsmadeeasy, Dyn, etc. But I would strongly recommend DuckDNS, the same DDNS provider that made this server online. DuckDNS takes no charge. They rely on donation only. Head to duckdns.org and sign in through one of the method they provided. Each account could have max of 5 domains.

After login, you can then go to install tab and follow their guide on how to set up the your server. It will first check if you have installed cron and curl by running:
ps -ef | grep cron
curl
then we will create a new directory named duckdns and add a .sh file inside:
mkdir duckdns
cd duckdns
vi duck.sh
Inside the duck.sh, copy this text and put it into the file (in vi you hit the i key to insert, ESC then u to undo) The example below is for the domain example. You can pass a comma separated (no spaces) list of domains you can if you need to hard code an IP (best not to - leave it blank and we detect your remote ip) hit ESC then use use arrow keys to move the cursor x deletes, i puts you back into insert mode:
echo url="https://www.duckdns.org/update?domains=example&token=[YOUR_TOKEN] ip=" | curl -k -o ~/
duckdns/duck.log -K -
Then we will make this excuatable
vchmod 700 duck.shnext we will be using the cron process to make the script get run every 5 minutes
crontab -ecopy this text and paste it at the bottom of the crontab
*/5 * * * * ~/duckdns/duck.sh >/dev/null 2>&1now save the file (CTRL+o then CTRL+x) lets test the script
./duck.shthis should simply return to a prompt, we can also see if the last attempt was successful (OK or bad KO)
cat duck.logif it is KO check your Token and Domain are correct in the duck.sh script
This script will push the current IP address to DuckDNS's server on a 5 minute interval, ensuring when our user typed "example.duckdns.org", they are always direct to the correct IP address no matter how our ISP changed the IP address of our machine.
Part 2: Router set up
Great! we are already half way there. Now that our user know where to find us, we need to then give them propor response. This part, we need to do two things. First, we need to set up the router to forward all incoming traffic that aims to talk to our server to the server. This is call Port Forwarding.
First of all, find out the subnet IP address of your server with this commend that will show you the MAC address of your server.
ip link showHead to your Router set up page, it is usually http://192.168.0.1/. Login to the router adminstration. In the router’s web UI (often under LAN → DHCP or Address Reservation), paste in the MAC address. Assign it your chosen IP (e.g. 192.168.1.50).
This step will grant a fix subnet IP address so that when our router receive incoming traffic, the will sent to this subnet IP address, specifically, your server. If we don't fix our subnet IP, our router might assign the subnet IP e.g. 192.168.1.50 to other device. Causing our router to miss the incomming traffic.
Now that we have a fix subnet IP, we can then do the Port Forwarding. In the router UI navigate to Port Forwarding (sometimes under “NAT” or “Virtual Servers”).
Create rules like:
| Service | Protocol | External Port | Internal IP | Internal Port |
|---|---|---|---|---|
| SSH | TCP | 22 | 192.168.1.50 | 22 |
| HTTP (Web) | TCP | 80 | 192.168.1.50 | 80 |
| HTTPS (Web) | TCP | 443 | 192.168.1.50 | 443 |
With this set up, whenever our server recieve a SSH/HTTP/HTTPS request, it will forward the request to our subnet IP which is fix to our server. Thus, complete the connection between the server and the user.
Once all of this is set up, we can test our setup by remote connect our server via SSH. Prior to SSH your server, you do need to install the server side of SSH since that is not default with every device.
Install server SSH on linux via:
sudo apt install openssh-server
sudo systemctl enable ssh --now
Once this is done, we can then access our server remotely by SSH on any machine anywhere. Simply use one of the following:
ssh YOUR_USER_NAME@example.duckdns.org
ssh YOUR_IP_ADDRESS
then enter the password, you can access the shell of your linux server.
One recommendation I want to make here is to use WinSCP, Cyberduck, or something equivalent to manage and change files on your server. Since you can access command line interface via your computer's bash/shell/terminal/powerShell, you don't need a monitor for your server anymore. Just plug it in somewhere with a ethernet and a power connection and that little server would kept running forever.

(WinSCP interface)

(Here instead of windows' terminal, I am using PuTTY for cmd interaction)
Part 3: Server set up.
Our final step is to set up a server side program that handles request. Here we choose Nginx to be our server side program. Of course there are plenty of great options on this part as well, but for demonstration purposes, we will go with Nginx.
Install Nginx
sudo apt update
sudo apt install nginx
then start Nginx
sudo systemctl start nginxwe can verify the Nginx's installation by
sudo systemctl status nginxyou should have saw something like the following:
% sudo systemctl status nginx
● nginx.service - A high performance web server and a reverse proxy server
     Loaded: loaded (/usr/lib/systemd/system/nginx.service; enabled; preset: en>
     Active: active (running) since Sat 2025-06-14 03:41:57 UTC; 1 week 1 day a>
       Docs: man:nginx(8)
   Main PID: 936 (nginx)
      Tasks: 5 (limit: 9288)
     Memory: 205.3M (peak: 208.5M)
        CPU: 14.091s
     CGroup: /system.slice/nginx.service
             ├─936 "nginx: master process /usr/sbin/nginx -g daemon on; master_>
             ├─937 "nginx: worker process"
             ├─938 "nginx: worker process"
             ├─939 "nginx: worker process"
             └─940 "nginx: worker process"

Jun 14 03:41:56 ruixinjxins systemd[1]: Starting nginx.service - A high perform>
Jun 14 03:41:57 ruixinjxins systemd[1]: Started nginx.service - A high performa>
 ESCOC
 server and a reverse proxy server
stem/nginx.service; enabled; preset: enabled)
2025-06-14 03:41:57 UTC; 1 week 1 day ago
A more through installation of Nginx can be followed throutgh Ubuntu Official website.
Once we successfully install Nginx, when you try to use your browser to access your server you will see something like the following:

Now in order to make our own website, we need to modify the default setting. The defalut website location is at /var/www/html/index.html. You can modify in this file/directory with whatever html/css/javascript you like. Or, you can modify the configure file under /etc/nginx/sites-enabled/default to declear your website location. Nginx will automaticlly return the html/css file according to your configuration via correct port. For reference, here is my configure file.
Here is my setting:
## 1) HTTP :80 default catch‑all

server {
    listen 80 default_server;
    listen [::]:80 default_server;

    root /var/www/html;
    index index.html index.htm index.nginx-debian.html;

    server_name _;

    location / {
        try_files $uri $uri/ =404;
    }
}

## 2) HTTPS :443 for jxins.duckdns.org

server {
    listen 443 ssl http2;
    listen [::]:443 ssl http2 ipv6only=on;

    server_name jxins.duckdns.org;
    root        /var/www/html;
    index       index.html index.htm index.nginx-debian.html;

    # ---- NEW: directory listing so JS can build the gallery ----
    location /images/ {
        autoindex on;             # <– allow plain HTML listing
        expires 30d;
        add_header Cache-Control "public";
    }

    # regular site files
    location / {
        ssi on;
        try_files $uri $uri/ =404;
    }

    # ---- SSL (managed by Certbot, do NOT edit paths manually) ---
    ssl_certificate     /etc/letsencrypt/live/jxins.duckdns.org/fullchain.pem;
    ssl_certificate_key /etc/letsencrypt/live/jxins.duckdns.org/privkey.pem;
    include             /etc/letsencrypt/options-ssl-nginx.conf;
    ssl_dhparam         /etc/letsencrypt/ssl-dhparams.pem;
}

##  3) HTTP → HTTPS redirect (Certbot)

server {
    if ($host = jxins.duckdns.org) {
        return 301 https://$host$request_uri;
    }

    listen 80;
    listen [::]:80;
    server_name jxins.duckdns.org;
    return 404;
}
Up to this point, the your website is all done. Take a break, grab a coffee, because you are have completed building your first server. Now, you should be able to access the website on any browser.
What's Next?
The hardest part of setting the server up is now complete. With this set of configurations, you can ensure that your website can be seen anywhere across the public net. All you need to do now is to actually create the content of your website via html/css/javascript. This tutorial is meant to help you set up the server so we won't go any further from here. There are a lot of fantastic blogs on how to make a beautiful html page. Hope this post did helped you somehow!